Showing posts with label Selenium Tutorials. Show all posts

TestNG Annotations in Selenium

TestNG :


TestNG is an automation framework mostly used in Selenium automation scripts for Web applications.It is very important to understand the annotations while working with TestNG for Selenium WebDriver. Testng providing suitable annotations to prepare Test scripts in Selenium WebDriver where you can pass test data from different files such as Excel,XLS files and You can run the scripts before tarting the class Method etc.

TestNG Annotations in Selenium


TestNG has below annotations those are

  1. BeforeSuite 
  2. AfterSuite 
  3. BeforeTest 
  4. AfterTest
  5. BeforeGroups
  6. AfterGroups 
  7. BeforeClass
  8. AfterClass
  9. BeforeMethod 
  10. AfterMethod 
You can read TestNG Tutorials from Here

Explanation:


@BeforeSuite: This annotation method will be run before all tests in this Test suite have to run.
@After Suite: This annotated method will be run after all tests in this Test suite have to run.
@BeforeTest: This annotated method will run before any test method which is belongs to the classes inside the test tag.
@After Test: This annotated method will be run after all the test method which is belongs to the classes inside the test tag have to run.
@BeforeClass: This annotated method will run before the first test method in the current class is invoked.
@After Class: This annotated method will be run after all the test methods in the current class have run.
@BeforeMethod : This annotated method will be run before each test method.
@AfterMethod: This annotated method will be run after each test method.

Example:


Before Test Selenium Web Driver will initiate and run the Tests in classes.

package com.fs.msn.automate;
import java.io.File;
import java.io.IOException;
import org.openqa.selenium.WebDriver;
import org.openqa.selenium.chrome.ChromeDriver;
import org.testng.annotations.BeforeTest;

public class SeleniumWebDriv {
 public static WebDriver driver=null;  
 public String baseUrl;
 
   @BeforeTest public void BeforeTests () throws IOException{ 
   
  //Import Chrome extension from Local machine   
 File ChromeDriver = new File("D:\\Rajesh\\2014\\Java_Applications\\Zip Files\\chromedriver.exe");     
 //Set Chrome driver property    
 System.setProperty("webdriver.chrome.driver", ChromeDriver.getAbsolutePath());
 
    driver = new ChromeDriver();    
 driver.manage().window().maximize();    
 baseUrl="http://www.wikishown.com";   
 driver.get(baseUrl);      
 }
}

Please provide your valuable comments on this post and provide any suggestions in order to get users experience ,so that i can improve the site content to understand easily.Thank you for reading my blog.

Also Read


Complete Selenium Tutorials
Verify Element is Enable
Selenium Xpath Tutorial
Selenium DataDriven Framework

How to read data from excel using Selenium

We have know that Selenium is using for Web application testing and Browser testing.

Today we are learning how to read data from excel using Selenium.In order to perform this action we need to download third party APIs for excel to load into Selenium.For this we are using jxl.jar file for Excel operations in Selenium.

Please download jxl jar from this download jar

Steps to create script.

1.Create project
2.Create Package
3.Create Class
4.Associate library files to project
5.Create the Excel sheet with data,for example i am using Gmail login.Please fine the below


6.Start the Selenium Server
7.Create the below script

package com.Gmail.Login;

import static org.junit.Assert.*;

import java.io.FileInputStream;
import java.io.IOException;
import jxl.Sheet;
import jxl.Workbook;
import jxl.read.biff.BiffException;
import org.junit.After;
import org.junit.Before;
import org.junit.Test;
import org.openqa.selenium.server.SeleniumServer;
import com.thoughtworks.selenium.DefaultSelenium;
import com.thoughtworks.selenium.SeleneseTestCase;

@SuppressWarnings({ "unused", "deprecation" })
public class Gmaillogins extends SeleneseTestCase{

   @Before
   public void setUp() throws Exception {
       SeleniumServer ss=new SeleniumServer();
       ss.start();
       selenium=new DefaultSelenium("localhost",4444,"firefox", "http://www.gmail.com");
       selenium.start();
   }

   @After
   public void tearDown() throws Exception {
   }

   @Test
   public void test() throws BiffException, IOException, InterruptedException {
       selenium.open("/");
       selenium.windowMaximize();
       FileInputStream fis=new FileInputStream("D:\\2014\\Java_Applications\\gmail_login.xls");
       Workbook wb=Workbook.getWorkbook(fis);
       Sheet s=wb.getSheet(0);
       selenium.type("id=Email",s.getCell(0,1).getContents());
       selenium.type("id=Passwd",s.getCell(1,1).getContents());
       Thread.sleep(3500);
   }

}

8.Save the script

9.Run the script

How to create data driven framework using selenium

Selenium Automated software tools on the market supports data driven testing, which allows software to automatically run a tests multiple times with multiple inputs and validations.Selenium is used to automate the software with data driven testing framework where we can use Excel sheets.


Below Script provide details about simple data driven testing using Excel sheet.


Steps:

Download apache POI jar files and add jars to project library in Eclipse

Selenium Script

Selenium Data Driven testing

package com.selenium.pack;

import java.io.FileInputStream;
import java.io.FileNotFoundException;
import java.io.IOException;

import jxl.Cell;
import jxl.Sheet;
import jxl.Workbook;
import jxl.read.biff.BiffException;

import com.thoughtworks.selenium.DefaultSelenium;
import com.thoughtworks.selenium.Selenium;

public class DataDriven {

    Selenium sel=new DefaultSelenium("localhost",4444,"firefox","https://");
    public void test() throws BiffException, IOException, InterruptedException {
        sel.start();
        sel.open("www.rightstart.com/customer/account/create/");
        sel.windowMaximize();
        Thread.sleep(7000);
        for(int i=1;i<=6;i++) {
            textBox(excelRead(2,i),excelRead(3,i));
        }
        /*textBox(excelRead(2,1),excelRead(3, 1));
        textBox(excelRead(2,2),excelRead(3, 2));
        textBox(excelRead(2,3),excelRead(3, 3));
        textBox(excelRead(2,4),excelRead(3, 4));
        textBox(excelRead(2,5),excelRead(3, 5));
        
        textBox(excelRead(2,6),excelRead(3, 6));*/
    }
    public void textBox(String sprop,String sval){
        if(sprop.startsWith("//")) {
            sel.type(sprop,sval);

        }else{
            sel.type("id="+sprop,sval);
        }
    }
    public String excelRead(int icol,int irow) throws BiffException, IOException {
        FileInputStream fis=new FileInputStream("C:\\Documents and Settings\\righstart.xls");
        Workbook wb=Workbook.getWorkbook(fis);
        Sheet s=wb.getSheet(0);
        Cell a=s.getCell(icol,irow);
        String a1=a.getContents();
        return a1;
    }
    public static void main(String[] args) throws BiffException, IOException, InterruptedException {
        DataDriven dataDriven=new DataDriven();
        dataDriven.test();

    }

}

How to get links property using Selenium


Create class in Eclipse.
public class Links
{
Selenium sel = new DefaultSelenium("localhost",4444,"firefox","http://www.xxxxxxx.com");
public void test() throws Interrupted Exception
{
sel.start();
sel.open("/")
sel.windowmaximize();
String a[]=sel.getAllLinks();
System.out.println("Number of links propertties:"+a.length);
int l=a.length;
for(i=0;i lessthan l;i plus plus)
{
System.out.println("link id"+a[i]);
}
}

How to handle Controls in Selenium


1.Create Class in Eclipse.

public class Controls
{
Selenium sel = new DefaultSelenium("localhost",4444,"firefox","http://www.xxxxx.com")
public void test() throws Interrupted Exception
{
sel.start();
sel.open("/");
sel.windowmaximize();
sel.click("link=Test page for Selenium Remote Control");
Thread.sleep(2500);
sel.select("id=Select with label only","label=Option three");
sel.select("id=Selectwith labels And Value","label=Option two");
//Handling Text Box
sel.type("id=textinput","Selenium");
//Handling Checkbox
sel.check("id=checkboxinput");
sel.click("//input[@type='radio' and value='b']");
}
public static void main(String args[])
{
Controls a = new Controls();
a.test();
}
}

Selenium Tutorials Assertions in Selenium


For verifying in selenium we have two verification points ,those are
  • Assert
  • Verify
  • WaitFor
  • Assert:If the test case pass it will go to the next test case and if the test case is fail then it will stop execution.
  • Verify:If the test cases pass or fail it will execute all the test cases at end of execution it eill display result.
  • WaitFor:WaitFor command is used to wait upto some extend to enable some condition to become enable.
Asserts
  • Assert Text Present:Verify the text on where ever in web page
  • Assert text:Verify the location of text
  • Assert Title:Verify the page title
  • Assert Element Present:Verify the element is present in web page
Assertions/Verify commands in Selenium IDE While Recording
  • Open Selenium IDE
  • Enter URL in Base URL of IDE
  • Enter same url in Firefox browser
  • Click on Enter
  • Right click on any where on page
  • You will see available commands according to below screen.

How to download and install the Selenium IDE


Follow below steps to download Selenium IDE firefox add on


  • Open Selenium.hq.org web site
  • Click on Downloads
  • Download latest version of Selenium IDE
  • Allow in window
  • Click on Install Now
  • Restart the firefox browser
  • Open firefox menu Tool-->Selenium IDE

How to Configure Selenium WebDriver in Eclipse

How to Configure Selenium WebDriver in Eclipse,it is very easy to configure Selenium WebDriver in Eclipse to prepare Selenium WebDriver Test scripts in Eclipse development tool.Selenium WebDriver jars can be downloaded from HERE.Please read Selenium Tutorials.

How to Configure Selenium WebDriver in Eclipse:

You can configure Selenium Jar files in Eclipse tool with the help of Configure Build Path option in Java Project,Please follow below step by step Tutorials to Configure Selenium WebDriver in Eclipse.

Steps:


1.Download "selenium-java-2.41.0" from selenium web site as mention above paragraph.
2.Download Eclipse for code writing from Here 
3.Now open Eclipse.
4.Right click on "Project Explorer" to create New project please follow below screen shots for mo re details.
How to Configure Selenium WebDriver in Eclipse

5.Enter Project name for Example Selenium WebDriver as below screenshot.
How to Configure Selenium WebDriver in Eclipse


6.Click on Finish.
7.Now project will create like below.
How to Configure Selenium WebDriver in Eclipse


8.Now right click on Project folder-->Build Path-->Configure Build Path.
How to Configure Selenium WebDriver in Eclipse

9.Select Library->Add External Library->Select all downloaded selenium-java-2.41.0 jar files from these folder.
How to Configure Selenium WebDriver in Eclipse

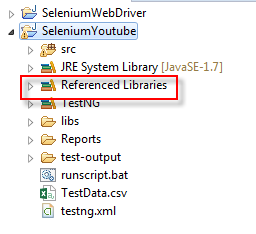
10.Click on OK button it will create Referenced Libraries in project folder as below screenshot.


How to Configure Selenium WebDriver in Eclipse


Thank you for reading Please read More Selenium Concepts.Please provide your valuable comments on this post.

Selenium XPATH Tutorials

Selenium Verification Points.

Read data from Excel using Selenium

Selenium DataDriven Framework
Handle Confirmation Box using Selenium